Mistwood Cottage
A Story in the Hills
How it Started
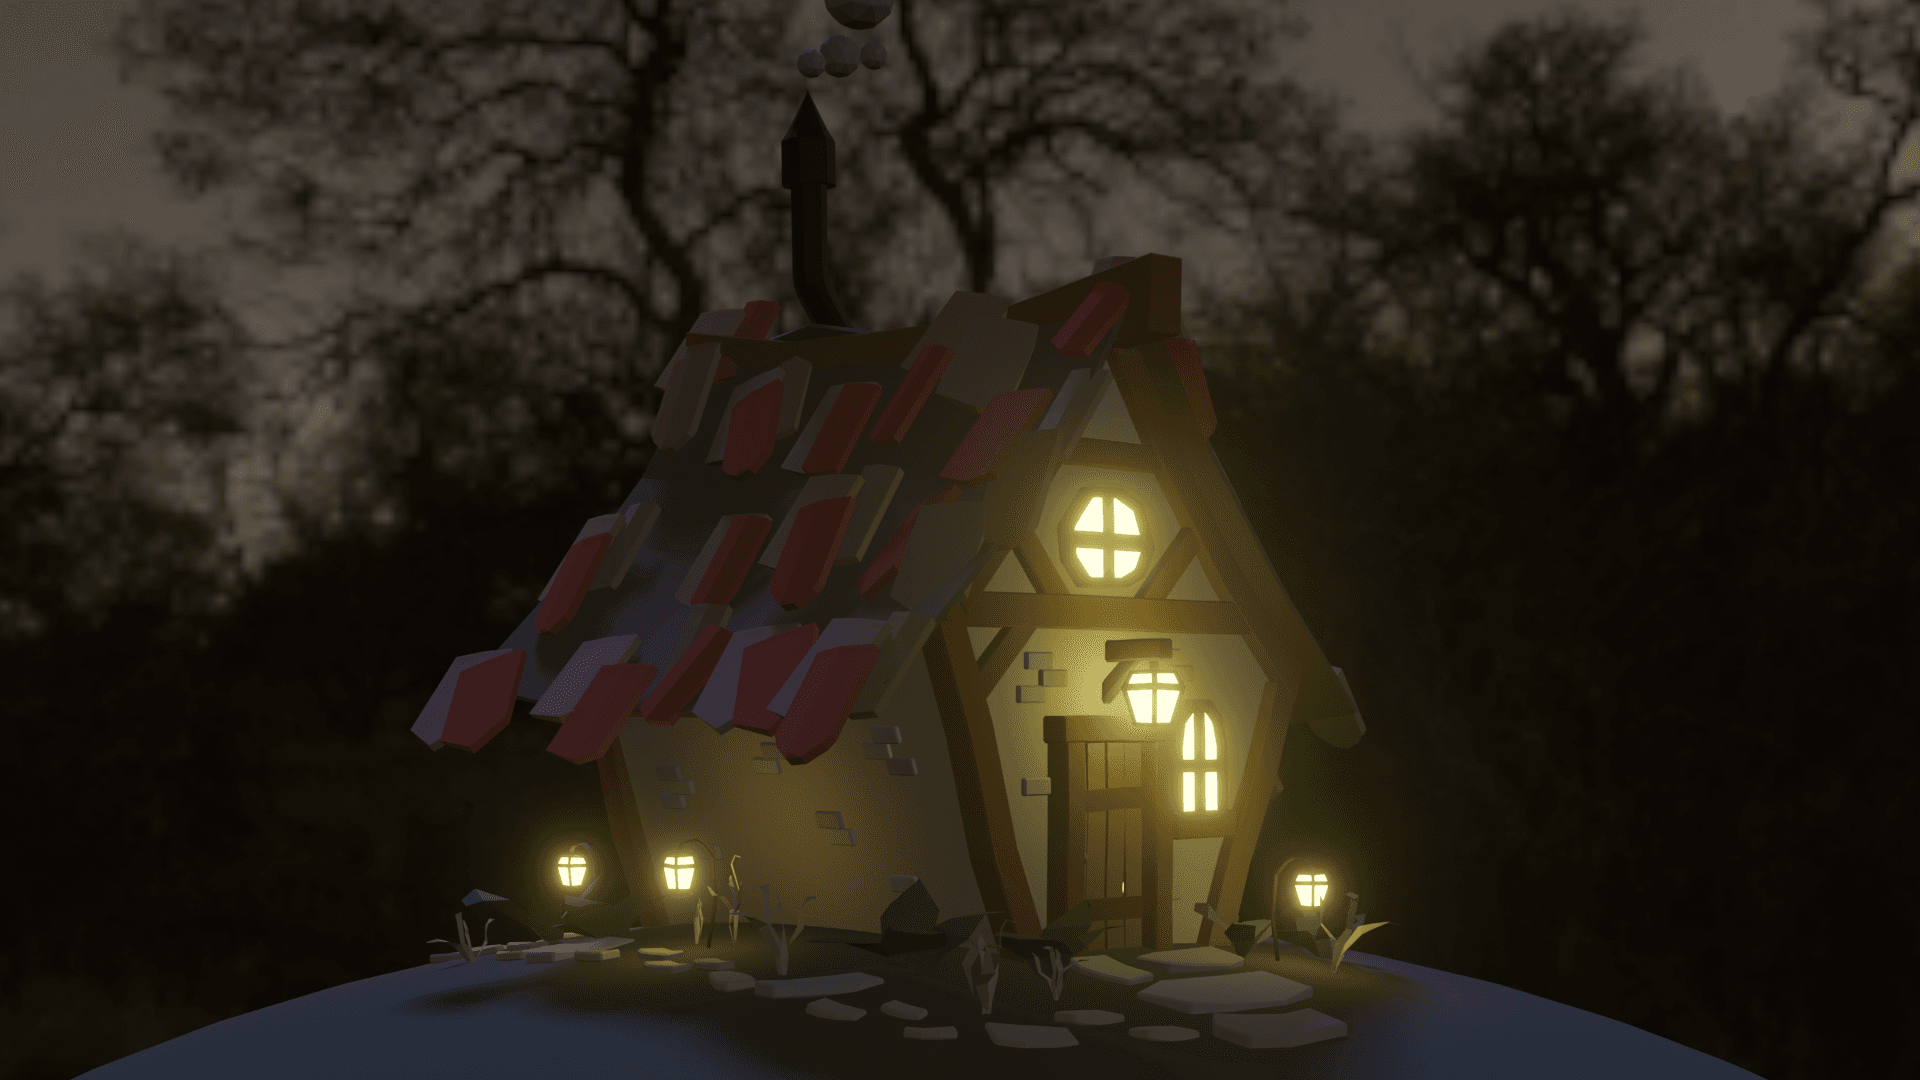
Mistwood Cottage began as a small practice exercise in Blender. Inspired by Grant Abbitt's (opens in new tab) excellent tutorial, I began modelling a little house: something quiet, slightly mysterious at first glance, perhaps even a little lonely in its isolation, yet ultimately still warm enough to feel like home.
The first version was fairly minimal. The cottage model was merged into a single object for .glb export, and one baked UV texture is used to render colours onto it with Three.js. Simple as it was, it was enough to capture the essence of the cottage and established a working pipeline from Blender to the web.


As part of documenting my webgl journey, I shared the project online on X. To my surprise, it gained some traction thanks to a retweet from Three.js account. Even mrdoob (the creator of Three.js) himself dropped a like. For a beginner project, this little recognition felt huge and motivating.

Revisiting 3D Modelling
The first deployment was…fine. But let's be real, the roof texture was broken, tiles were missing and overall it felt a little lifeless. As someone who cares deeply about details and aesthetics, I knew I could push it much further.

With a renewed sense of ambition, I return to Blender to redesign Mistwood Cottage into something that met my own standards. The goal was to create a world with richer details, introduce interaction, and create a calmer, more immersive atmosphere. The result is still far from perfect, with bugs and rough edges here and there, but it now feels like a world worth slowly building upon.
Interior Room
The first challenge I set out to tackle was adding warmth to the interior of the cottage. I wanted the cottage to feel cozy, like somewhere you would want to curl up with tea and a book.
I've always loved natural light, I can't imagine living in a room without a big window and sunshine streaming in. That personal preference crept into the cottage design, where I probably added more windows than walls. I wanted to emulate a sense of openness to the space and it worked.


Terrain & Environment
The world around the cottage began with the TXA Landscape (opens in new tab) add-on, which gave me a solid foundation of rocky mountains. From there, the terrain was refined by hand using Blender sculpt mode — raising hills, carving a pond and shaping gentle slopes.


Since performance on the web was a priority, I simplified the world aggressively. The final scene kept only a single dominant mountain and stylized, geometric trees. I also decimated the terrain, cutting the vertex count down by roughly ~200k.


What makes the scene more engaging are small environment details such as a cobblestone path leading to mysterious well perched on a hill.

I also added some outdoor seatings, a small wooden platform stretching towards the pond and benches tucked under the shaded trees to breathe more life into the scene.

Materials
The first version relied on a single-color Principled BSDF material, but it looked flat on screen. To make the cottage feel more livable, I introduced textures sourced from BlenderKit and 3D Textures. Each was chosen to fit the ambience — from exterior elements like grass, leaves, wood, concrete, and cobblestone, to interior touches such as pillows, blankets, curtains, cushions, and countertops.
✨Here's a small Blender trick that I learned✨ The books on the shelves all share the same material, but I added variation by mixing the cover image with a Color Ramp. With the help of the Object Info node, each book gets a slightly different tint, resulting in a more natural, random set of colourful spines.


Lightings
I wanted Mistwood Cottage to shift with time, so I designed four distinct scenes — Sunrise 🌅, Daylight ☀️, Pink Sunset 🌸 and Night 🌌. Blender allows us to define multiple World environments, each with its own node setup, which makes them very convenient to manage.


Each World has its own node setup. For instance, the Sunrise scene uses a pair of sun to provide softer shadows, along with two HDRIs (High Dynamic Range Image) to simulate realistic lighting conditions.

Beyond global illumination, many objects use emissive materials that adds warmth and life to the scene. Think of interior lamps, street lights lining the cobblestone path and bulbs above doorways — each switching on or off depending on the time of day. To give these emissive surfaces a stronger sense of presence, I paired them with a subtle Spot Light to amplify their glow.
For ambient lighting, I introduced a mix of Sun lamps and Area lights to balance the scene. Using Blender's Light Linking feature, we could target specific regions. In our case, the Area lights are constrained to the room interior. The impact of this step was remarkably huge, it instantly made the room more vibrant and alive.


Baking UVs
Real-time light and shadow calculation on the web are expensive. To keep performance smooth, I rely on baked textures. They are precomputed images that already encode the light information and capture the mood of each day-night cycle.
To stay organized, I divided these textures into groups: Cottage, Room Interior, Environment, and Terrain. The Room Interior goes even further, split into Plain and Pattern textures. This separation gave me fine control over resolution. For instance, a patterned cushion that is small in scale but visually prominent, could be UV-scaled up to preserve detail without inflating the size of less important assets.
With 4 lighting cycles and 5 texture sets, the total came to 20 baked textures — quite a lot! To optimize, I converted the original JPEGs into WEBP, a lighter format supported by all browsers. The difference was dramatic: from nearly 100MB down to 17.3MB, including the .glb files.
✨A neat Blender trick I picked up✨ For the terrain, I used a high-to-low poly baking technique. It keeps the vertex count low, while the material still retains the fine details of the high-resolution mesh. The process works by projecting details from the high-poly model onto a low-poly one through baked maps — such as diffuse or normal map. The result is a lightweight model that still looks rich and detailed.
I'm also working on a short article that explains this process in more depth — stay tuned!
WebGL & Animations
Shaders
The magic of shaders is what truly brings the world to life. While I had plenty of ideas I wanted to experiment with, I narrowed it down to a small set of shaders that can have a major impact to the overall atmosphere.
The first is a texture transition shader, inspired by Paul West. It smooths out the day-night cycles with a crossfade between baked textures. With just a small piece of GLSL code, the entire world could breathe and seamlessly shift from morning to night — whether driven by a time lapse or by user interaction.
The trick to animating these textures is surprisingly simple: apply mix(previousTexture, currentTexture, progress) directly in the Three.js material map shader. This line blends one texture into the next based on a progress value, creating that seamless transition.
I'm also working on a short article that will break this down step by step — coming soon!
On top of that, I experimented with several atmospheric shaders to deepen the sense of immersion. Using Three.js built-in fog, the environment gradually softens by distance, cloaking the scene in a subtle, atmospheric haze.
Tiny fireflies glow and drift through the scene, adding gentle movement and a sense of life to the night. I used two placement strategies: one clusters them in a sphere around glowing objects — like the lamp above the doorway — while the other scatters them randomly across the terrain's width and length. This combination makes the fireflies appear more organic and varied.
A delicate smoke shader rises from the tea cup on the study desk, adding warmth and subtle motion to the interior. Inspired by techniques from Bruno Simon's course (opens in new tab), this effect brings a quiet sense of life to an otherwise still scene.
For surfaces, I introduced a reflective mirror shader built on Three.js's Reflector class. Applied to the plane of the mirror model, it allows users to catch their own reflection in real time.
To give the cottage a lived-in feel, I added a dusty window shader using a simple normal and color map with MeshBasicMaterial. The subtle imperfections make the glass feel aged and tactile.
The refractive glass roof, powered by Three.js's Refractor class, bends and shifts light as it passes through, creating a natural distortion that enhances realism.
And finally, the water shader, inspired by Dan Greenheck (opens in new tab), simulates dynamic waves with subtle acoustic ripples. It makes the water surface feel alive and responsive. This effect is built from two meshes: a high-segmented Three.js plane that serves as the animated water surface (replacing Blender's basic plane), and a sculpted pond ground mesh beneath it where the light acoustics are applied. Together, they create the illusion of depth and movement without adding unnecessary complexity.
Emission Lights
As discussed under 2.0 Revisting 3D Model, Mistwood cottage cycles through four different day-night phases. These are driven by baked textures that emulate the changing light conditions.
For emissive objects, something a little special is going on ✨ First of all, in Blender, each emissive object is set up with two UV Maps and two materials. Since Blender and Three.js both support multiple UV information, this setup allows us to easily toggle between the baked textures and a custom emission shader for the lamps.
When the light is OFF, the Principled BSDF node is connected, providing a solid base colour with its own metallic and roughness properties. During this state, the object uses its default UVMap, and that map is included in the final baked texture.

In contrast, when the light is ON, the Emission node is connected, casting beautiful soft lights onto nearby objects. Although the object affects how the output baked texture look, it does not store any texture of its own.
In this condition, I created a custom emission shader material in Three.js which uses the second UV Map (UVMap.002) to control the light gradient. The UV unwrapping was also done differently. Each part of the lamp is scaled to fill the UV space vertically to ensure a nice, linear gradient.

The custom emission material comes in two flavour: linear or radial emission. To make this reusable, I created a dedicated Emissive class which allows each lamp to be customisable with its own gradient colour, intensity and gradient type.


Since there are many emissive objects — interior lamps, street lamps and door lamps — I manage their state with a constant. Whenever the day-night cycle changes, each emissive object toggles between baked texture when the light is off, or the custom Emissive material when it's on.
Physics & Player Controls
Physics governs how objects move as we expected — mountains become another hill to climb, trees act as roadblocks to an otherwise straight path and ponds sink the body down. To emulate real world behaviour, Rapier3D (opens in new tab) physics engine is highly utilised.
First and foremost, when it comes to applying Physics, the boundary shape that encapsulates the object has to be determined. This is referred as Colliders, the geometric shapes that generate contacts and collision events when touched. The more detailed a collider, the higher the computational cost. Striking the right balance between realism and performance is key to maintaining a smooth user experience.
Mistwood Cottage employs a variety of collider shapes, from simple to complex: cuboid, convex hull and trimesh.
- Cuboid: used for simple elements, i.e. study desk, kitchen countertop, player body
- Convex hull: applied to objects that don't require high precision, i.e. the well
- Trimesh: supports meshes with cavities and is best suit for terrain and large structures.
Prior to .glb export in Blender, all environmental elements are merged into one single mesh. While trimesh is less performant, it is the most practical choice for this merged meshes.
In Rapier, these colliders are defined as:
The physics outline can be viewed on the debug page. Amongst many other things, the debug page is useful for analysing the physics engine and identifying points of improvements.

With the physics bodies in place, the next challenge was the player movement. Rapier provides a handy character controller class, which makes it possible to customise how the player interacts with the world.
The classic controls are included: arrow keys or WASD for movement, and Space bar for jumping. Each key has a small on-screen UI that lights up when pressed, indicating its active state. To make the motion feel more natural, I added a movement decay, allowing the character to gradually come to a stop instead of halting abruptly. I also checked whether the character is grounded before triggering a jump, preventing those awkward infinite mid-air hops.
For now, the player is represented by a simple placeholder character, inspired by Bruno Simon's Infinite World (opens in new tab). Its body colour shifts along with the day-night cycle, keeping it visually connected to the world. A custom character model is on the roadmap, but at this stage, the placeholder works fine.
For mobile support, the control UI is enlarged into on-screen buttons, making it easy to move and jump with touch input.

Third Person Camera
A third-person camera system orbits around and follows the player. Inspired by Bruno Simon's Infinite World (opens in new tab), it's designed to feel smooth and responsive, giving users control over how they experience Mistwood Cottage.
The UI slider lets players adjust the camera's distance, a simple but effective way to personalize perspective. Slide it closer for an intimate, over-the-shoulder view of the character, or pull it back for a wide-angle look at the cottage and its surroundings.
Diving into the technical side, the camera uses a mouse-based orbiting. By dragging the screen, users can rotate the view horizontally and vertically around the character. The vertical angle (phi) is clamped so the camera never flips upside down ensuring navigation feels natural rather than disorienting.
Positioning is handled through spherical coordinates, which are converted into Cartesian space to calculate the camera's offset relative to the player. Instead of snapping to that position, the system uses lerping (linear interpolation) to ease into motion, giving the camera a polished, fluid feel.
A subtle but important safeguard keeps the camera above the landscape. By checking the terrain elevation, the system prevents the camera from dipping below ground level, ensuring the view always stays comfortably above the environment.
The result is a third-person camera that feels natural, smooth, and adaptable, one that lets players choose their perspective without ever breaking immersion.
Interactivity & Music
To make the interior easier to explore, the front and left walls of the cottage can be toggled on and off. This feature is disabled while the player is inside, ensuring the dragging of mouse for camera orbiting doesn't accidentally toggle the walls. A change in the cursor icon reinforces this interaction, providing a clear feedback.
As the player moves through different parts of the world, the ambient soundscape adapts. Inside the cottage, the chirping of insects fades into soft piano jazz. As the player goes dipping into the lake, the audio shifts into a muffled underwater ambience, surrounding the player with waves. These subtle transitions help the world feel more alive and responsive.
Another layer of interactivity comes with a coin collection mini game, designed to encourage players to roam the world. For best performance, Instanced Mesh is used to duplicate the coins and scatter it randomly throughout the terrain.
Placing the coins correctly required a bit of math. Using Three.js Box3, I first calculated the minimum and maximum bounds of the terrain along the X and Z axes.
Then, with raycasting, I determined the terrain's height at each coin's location and place the coin above it with some padding. This ensures that coins always rest naturally above the ground surface.
Storytelling
Storytelling is one of the most important aspect of a webgl project to attract and guide the user's experience. Currently, the user is free to explore the world to discover delightful experiences.
Struggles & Solutions
Building Mistwood Cottage wasn't without its fair share of challenges. Along the way, I ran into plenty of stumble blocks, some small annoyances, others tricker technical hurdles. The more complex issues deserve their own deep dive, which I'll cover in a separate article. But for now, let's highlight a few of the notable bumps I encountered during development.
Managing Complexity (UV Packing Tetris)
As Mistwood Cottage grew into a complex Blender scene, manually arranging UVs for every object became unrealistic — like playing tetris. What started as a manageable task turned into hours of tedious adjustments with little room for changes and optimisation.
That's when I decided to invest in UVPackMaster3 (opens in new tab), and honestly, it was one of the wisest decisions of the entire project. In retrospect, I should have made that choice much earlier.
UVPackMaster3 not only saved enormous amounts of time with its automatic packing, but also gave me fine control over UV rotation. This turned out to be crucial when working with pattern-based textures, where directionality really matters — think wood grains, fabric weaves or tiled surfaces.
Sure, you can rotate textures in material nodes, but controlling it at the UV level gives more flexibility for future changes. By assigning a rotation lock with the value 0° to specific UV islands, I could keep critical surfaces correctly aligned while letting the rest rotate freely to maximise packing efficiency.

Another powerful feature of UVPackMaster3 is its ability to orient UVs automatically based on their 3D space orientation. This came in handy for the skeleton tree in front of the cottage, where branches sprawl in all sorts of directions. Instead of painstakingly adjusting each UV island, the tool aligned them intelligently, letting the wood grain flow naturally across the geometry.

Baked Baked Textures Not Applying Correctly
This issue only became noticeable once the GLB model was imported into Three.js. It was observed that some objects of the model were not using the baked texture as expected.

The root cause turned out to be a conflict between UVMap and autoMap. When applying textures using Blender Toolkit, autoMap UV channel might be created automatically. In some cases, this autoMap channel was also set as the active one.
The problem is that Three.js expects the first UV channel (UVMap) unless otherwise specified. The fix is simple, we simply need to make sure the correct UVMap is selected (with the camera icon active) and re-unwrapping the objects to ensure the bake references the right data. As a cleanup step, I also deleted the unused autoMap channel to prevent the same issue from sneaking back in later.
Conclusion
This project has been one of my biggest learning experiences in webgl. I feel like I've truly leveled up my Blender skills into an intermediate stage. Shaders, which once felt intimidating but exciting, have now become approachable and something I genuinely enjoy. I look forward to creating more shader-driven experiences in the future.
A few weeks after deploying Mistwood Cottage and sharing it on Three.js Discourse, Three.js Journey Discord, X and LinkedIn, the project has garnered 300+ visits from around the globe. I am especially grateful to the Three.js community on Discourse for their generous feedback and encouragement.
This is just the beginning, Slowly but surely, I will keep refining and expanding Mistwood Cottage :)
Enjoyed this article? Share it with a friend. Have a question, feedback or simply wish to contact me privately? Drop me an email at hi@amiradeuraseh.com or DM and I'll do my best to get back to you.
오늘도 행복한 하루 뒤세요. Warmest regards, Amira